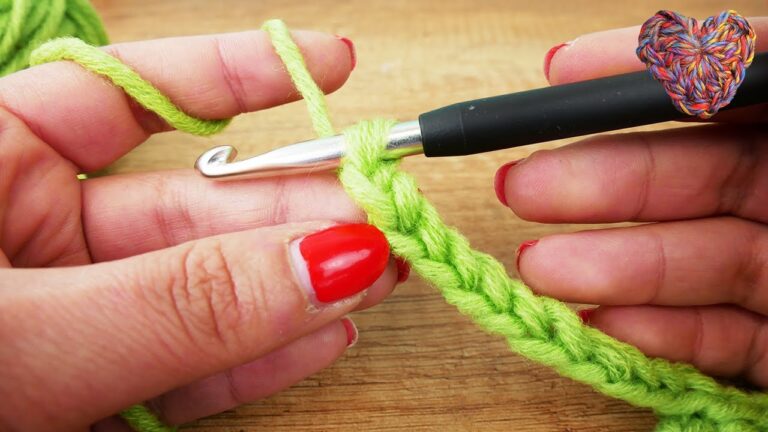
Spültuch Häkeln
Have you ever wanted to add a touch of handmade charm to your kitchen? Look no further than the delightful art of Spültuch Häkeln. Whether you’re a seasoned crochet enthusiast or a complete beginner, this age-old craft allows you to create beautiful dishcloths that are both practical and decorative. With a simple hook and some colorful yarn, you can crochet your way to a kitchen full of uniquely designed Spültuch Häkeln treasures. So, let’s dive into the world of crochet and discover the joy of creating your own Spültuch Häkeln masterpieces.

This image is property of www.gemachtmitliebe.de.
Choosing the Right Materials
When it comes to crocheting dishcloths, selecting the right materials is crucial. The key to a successful project lies in choosing the correct yarn and hook size, as well as having additional supplies on hand for a smooth crocheting experience.
Selecting the Yarn
When choosing yarn for your dishcloth, it’s important to opt for a material that is durable and absorbent. Cotton yarn is an excellent choice for dishcloths as it is both soft and sturdy. It has the ability to absorb water efficiently, making it perfect for cleaning dishes and kitchen surfaces.
There are various types of cotton yarn available, from mercerized cotton for a smooth and lustrous finish to organic cotton for a more natural feel. Consider the texture, thickness, and color options when selecting your cotton yarn. Worsted weight cotton yarn is a popular choice for dishcloths due to its versatility and availability.
Choosing the Hook Size
The size of your crochet hook will affect the final dimensions and texture of your dishcloth. Generally, a smaller hook will result in a tighter fabric, while a larger hook will create a looser and more lightweight fabric.
For dishcloths, a hook size between 4mm and 5mm is commonly used with worsted weight cotton yarn. This size range provides a good balance between stitch definition and workability. However, feel free to experiment with different hook sizes to achieve the desired fabric texture and drape for your project.
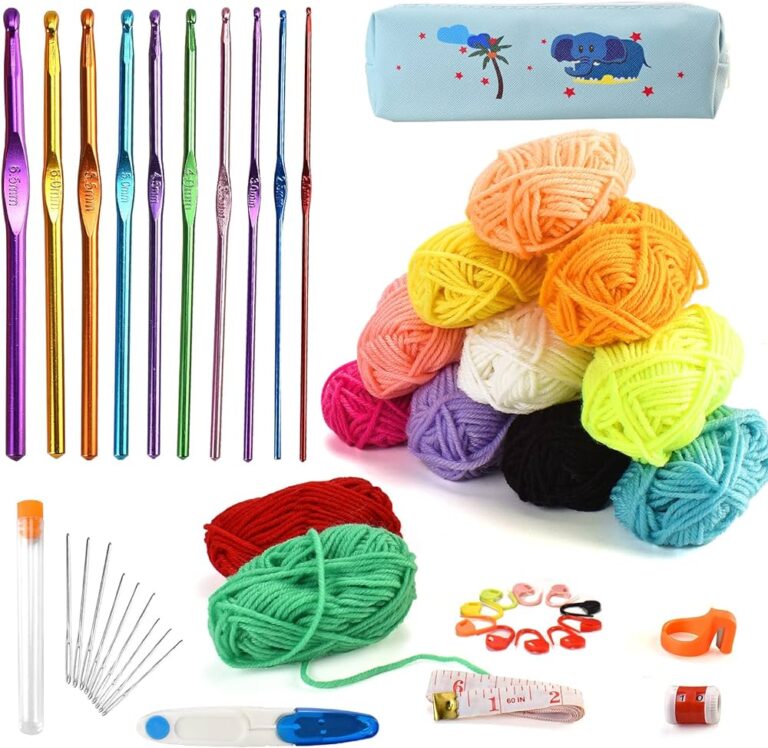
Additional Supplies
In addition to yarn and a crochet hook, there are a few additional supplies that will enhance your crocheting experience. Here are some recommended items to have on hand:
- Scissors: A good pair of sharp scissors is essential for cutting yarn and tidying up loose ends.
- Yarn Needles: These blunt-tipped, large-eye needles are perfect for weaving in yarn tails and joining pieces together.
- Stitch Markers: These handy tools help you keep track of specific stitches or pattern repeats.
- Measuring Tape: For ensuring your dishcloth reaches the desired dimensions.
- Stitch Counter: If you’re working on a pattern that requires counting stitches or rows, a stitch counter can be a lifesaver.
Having these supplies readily available will make your crocheting process smoother and more enjoyable.
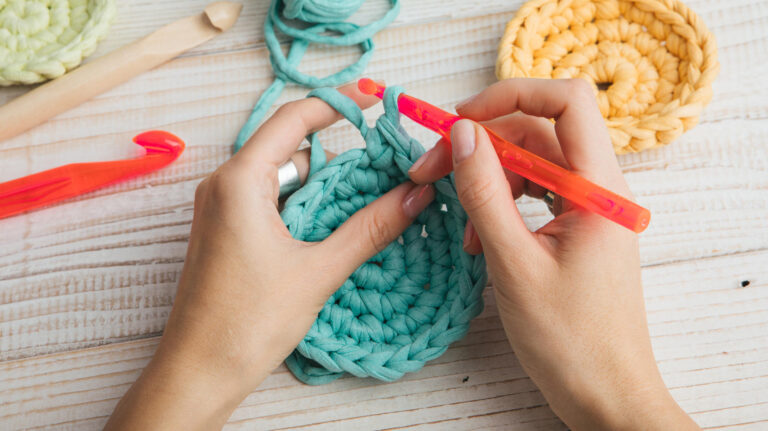
Getting Started
Now that you have gathered all the necessary materials, it’s time to get started on your crocheted dishcloth project. Before diving into the stitches and patterns, it’s important to familiarize yourself with the foundational techniques.
Creating a Slip Knot
To begin any crochet project, you’ll need to start with a slip knot. This is a loop that secures your yarn to the crochet hook. There are several methods to create a slip knot, but one common technique is as follows:
- Hold the yarn in your hand, leaving a long tail.
- Fold the yarn over itself to create a loop.
- Insert your hook through the loop.
- Pull the tail end of the yarn to tighten the loop around the hook.
Practicing this step will set you up for success in starting your dishcloth project.
Foundation Chain
Once you have your slip knot, it’s time to create the foundation chain. The foundation chain serves as the base for your stitches. To make a foundation chain:
- Hold the slip knot on your hook.
- Yarn over the hook by wrapping the yarn around it from back to front.
- Pull the wrapped yarn through the slip knot loop on your hook, creating a new loop.
- Repeat steps 2 and 3 until you reach the desired number of chains.
The length of your foundation chain will determine the width of your dishcloth. Remember to keep your chains loose but evenly tensioned to ensure flexibility in your fabric.
Making Your First Row
With your foundation chain complete, it’s time to make your first row of stitches. The specific stitch you choose will depend on the pattern or design you are following, but commonly used stitches for dishcloths include single crochet, half double crochet, and double crochet.
To make your first row:
- Identify the stitch indicated in your pattern or choose the stitch you wish to use.
- Insert your hook into the designated stitch.
- Yarn over and pull the yarn through the stitch, creating two loops on your hook.
- Yarn over again and pull the yarn through both loops on your hook, completing one stitch.
- Repeat steps 2-4 across the foundation chain until you reach the end.
Remember to maintain an even tension as you work your stitches to ensure consistent and neat rows.
Working the Basic Stitches
Once you have mastered the foundational techniques, it’s time to delve into the basic stitches commonly used in crochet dishcloths. These stitches will form the backbone of your dishcloth design and provide the texture and structure you desire.
Single Crochet Stitch
The single crochet stitch is one of the most versatile and commonly used stitches in crochet. It creates a dense and sturdy fabric, making it perfect for dishcloths.
To crochet a single crochet stitch:
- Insert your hook into the designated stitch.
- Yarn over and pull the yarn through the stitch, creating two loops on your hook.
- Yarn over again and pull the yarn through both loops on your hook, completing one single crochet stitch.
- Repeat steps 1-3 across the row, maintaining an even tension.
The single crochet stitch is easy to learn and creates a compact and durable fabric, ideal for scrubbing and cleaning.
Half Double Crochet Stitch
The half double crochet stitch is slightly taller than the single crochet stitch, making it a great option for adding texture and pattern to your dishcloth. It creates a fabric that is not too dense, yet maintains sufficient durability.
To crochet a half double crochet stitch:
- Yarn over before inserting your hook into the designated stitch.
- Insert your hook into the stitch.
- Yarn over and pull the yarn through the stitch, creating three loops on your hook.
- Yarn over again and pull the yarn through all three loops on your hook, completing one half double crochet stitch.
- Repeat steps 1-4 across the row, maintaining an even tension.
The half double crochet stitch is a versatile stitch that adds a bit of height and texture to your dishcloth, making it a popular choice.
Double Crochet Stitch
The double crochet stitch is taller than both the single crochet and half double crochet stitches, creating an open and airy fabric. It works up quickly, making it suitable for larger projects, while still providing sufficient durability for dishcloths.
To crochet a double crochet stitch:
- Yarn over before inserting your hook into the designated stitch.
- Insert your hook into the stitch.
- Yarn over and pull the yarn through the stitch, creating three loops on your hook.
- Yarn over again and pull the yarn through the first two loops on your hook, leaving two loops.
- Yarn over once more and pull the yarn through the remaining two loops on your hook, completing one double crochet stitch.
- Repeat steps 1-5 across the row, maintaining an even tension.
The double crochet stitch is ideal for creating an open and breathable fabric, perfect for quick absorption and drying.
Adding Texture and Design
While basic stitches are sufficient for creating functional dishcloths, adding texture and design elements can take your creations to the next level. Here are a few techniques and stitches you can incorporate to elevate the visual appeal of your crocheted dishcloths.
Front and Back Loop Only Stitches
By working stitches into either the front or back loops only, you can create ribbed textures or wave-like patterns in your dishcloth. This technique adds dimension and visual interest to your project.
To crochet front and back loop only stitches:
- Identify whether you will be working into the front or back loop.
- For front loop only, insert your hook into the front loop of the designated stitch.
- For back loop only, insert your hook into the back loop of the designated stitch.
- Continue crocheting as usual, following the instructions for the chosen stitch (e.g., single crochet, half double crochet, double crochet).
By selectively working into the front or back loops, you can create unique patterns and textures that will impress both you and your kitchen guests.
Shell Stitch
The shell stitch is an elegant and visually striking pattern that adds a touch of sophistication to your dishcloths. It consists of multiple stitches worked into the same stitch or space, resulting in an elongated cluster of stitches.
To crochet a shell stitch:
- Identify the number of stitches to be worked in the same stitch or space (e.g., 5 double crochet stitches in the same stitch).
- Crochet the specified number of stitches into the designated stitch or space, without completing the final step of each stitch.
- Once all the stitches are half completed, yarn over and pull through all the loops on your hook.
- Depending on the pattern, you may need to chain or skip stitches to maintain the desired spacing between shell stitches.
- Repeat steps 1-4 across the row, maintaining an even tension.
By incorporating shell stitches into your dishcloth design, you can create a visually stunning piece that will add a touch of elegance to your kitchen.
Puff Stitch
The puff stitch is a fun and unique stitch that creates a raised, bobbly texture in your dishcloth. It adds both visual and tactile interest, making it a popular choice for creating textured patterns.
To crochet a puff stitch:
- Yarn over before inserting your hook into the designated stitch.
- Insert your hook into the stitch.
- Yarn over and pull the yarn through the stitch, creating three loops on your hook.
- Repeat steps 2-3 in the same stitch for the desired number of times (e.g., 5 times).
- Yarn over and pull through all the loops on your hook.
- Depending on the pattern, you may need to chain or skip stitches to maintain the desired spacing between puff stitches.
- Repeat steps 1-6 across the row, maintaining an even tension.
The puff stitch adds a playful and textured element to your dishcloth, making it a joy to both make and use.

This image is property of i.ytimg.com.
Creating Patterns and Colorwork
Once you have mastered the essential stitches and added texture to your dishcloth, it’s time to explore the world of patterns and colorwork. These techniques allow you to create visually stunning effects and add a personal touch to your crocheted dishcloths.
Stripes and Color Changes
Adding stripes to your dishcloth is a simple and effective way to incorporate color and pattern. By alternating between different colors or shades of yarn, you can create vibrant and eye-catching designs.
To crochet stripes:
- Crochet your first row or round using one color.
- When you reach the end of the row or round, cut the yarn, leaving a tail.
- Join the new color by making a slip knot with the new yarn and inserting your hook into the stitch where you want the new color to begin.
- Yarn over with the new color and pull through the stitch, securing the new color.
- Continue crocheting with the new color as desired.
- When you want to switch back to the previous color or introduce a new color, repeat steps 2-4.
Be sure to carry or weave in the yarn tails as you go to maintain a clean and professional-looking fabric.
Basketweave Stitch
The basketweave stitch is a fascinating technique that mimics the interwoven pattern of a traditional basket. It creates a unique texture that is both visually appealing and functional for scrubbing and cleaning.
To crochet the basketweave stitch:
- Determine the desired width of each woven section (e.g., 4 stitches).
- Crochet the specified number of stitches (e.g., single crochet, half double crochet, or double crochet) as indicated in the pattern.
- For the next section, crochet the same number of stitches, but in the opposite stitch (e.g., if you started with single crochet, switch to double crochet).
- Repeat steps 2-3 across the row, alternating between the designated stitches and repeating the pattern for the desired number of rows.
The basketweave stitch adds a visually stunning yet functional element to your dishcloth, making it an excellent choice for showcasing your crochet skills.
Cable Stitch
The cable stitch is a technique borrowed from knitting that can be adapted for crochet dishcloths. It creates a beautiful and intricate design that resembles twisted cables, adding elegance and sophistication to your project.
To crochet the cable stitch:
- Determine the desired width of the cable (e.g., 4 stitches).
- Crochet the specified number of stitches for the background section (e.g., single crochet, half double crochet, or double crochet) as indicated in the pattern.
- For the cable section, crochet the same number of stitches, but out of order (e.g., skip the first stitch and work into the next 3 stitches).
- Complete the background section with the remaining stitches.
- Repeat steps 2-4 across the row, maintaining the cable section pattern and background stitches as indicated in the pattern.
The cable stitch adds a touch of elegance and complexity to your dishcloth, making it a true work of art.
Shaping and Increasing
While dishcloths are often simple rectangular shapes, understanding techniques for shaping and increasing can elevate your designs and add versatility to your crochet repertoire.
Increasing Stitches
Increasing stitches allows you to make your dishcloth wider or change its shape. Common methods for increasing stitches in crochet include working multiple stitches into the same stitch or space or using stitch patterns that naturally increase the stitch count.
To increase stitches:
- Identify the increase method or stitch pattern indicated in your pattern.
- Follow the instructions for the specific increase method or stitch pattern.
- Continue crocheting as usual, following the pattern or maintaining the stitch pattern, incorporating the increases as needed.
By increasing stitches strategically, you can create dishcloths with unique shapes and dimensions.
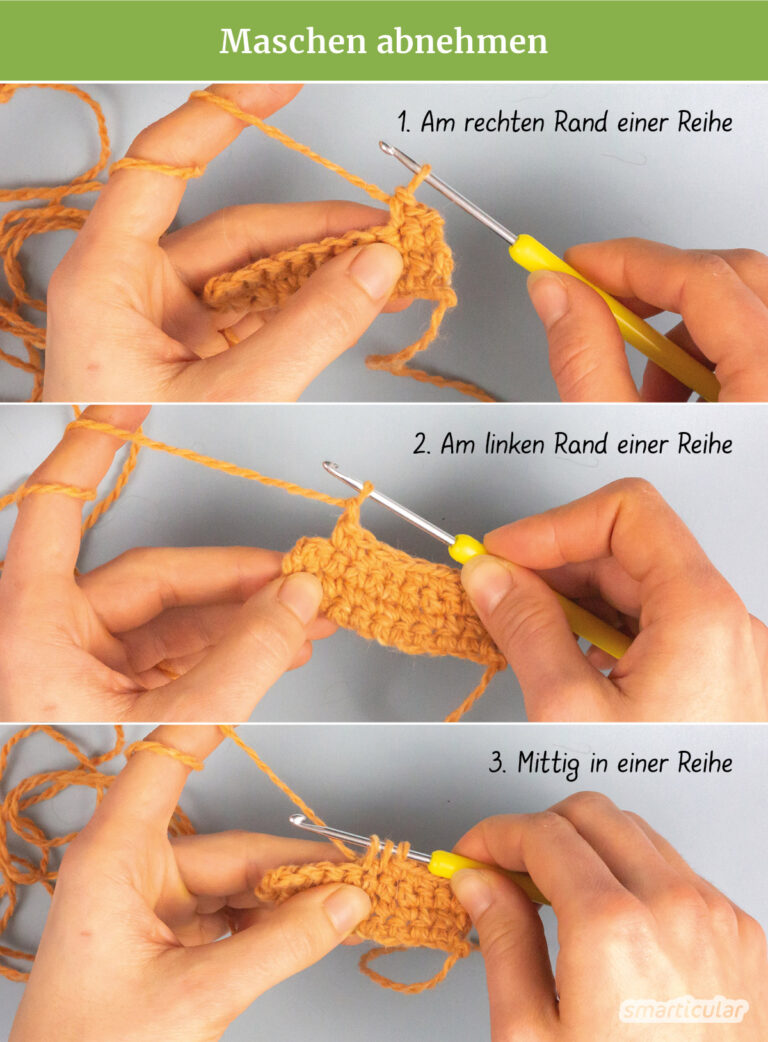
Decreasing Stitches
Decreasing stitches is the opposite of increasing and is used to shape your dishcloth or create curves and angles. Common methods for decreasing stitches in crochet include skipping stitches, working stitches together, or using specific stitch patterns that naturally decrease the stitch count.
To decrease stitches:
- Identify the decrease method or stitch pattern indicated in your pattern.
- Follow the instructions for the specific decrease method or stitch pattern.
- Continue crocheting as usual, following the pattern or maintaining the stitch pattern, incorporating the decreases as needed.
By skillfully incorporating decreasing techniques, you can create dishcloths with unique shapes and angles, adding a touch of creativity to your crochet projects.
Working in the Round
While dishcloths are typically crocheted in rows, exploring working in the round opens up new possibilities for creating different shapes and patterns. Circular dishcloths can be used for various purposes, from pot holders to decorative coasters.
To work in the round:
- Create a slip knot and make the foundation chain as indicated in your pattern.
- Connect the last chain to the first chain with a slip stitch, forming a ring.
- Crochet your first round into the ring according to your pattern.
- Continue crocheting subsequent rounds, spiraling upwards, following your pattern or maintaining the increase or decrease pattern as instructed.
Working in the round allows you to create interesting patterns, such as the popular granny square dishcloth, as well as explore various stitch patterns and colorwork designs.

This image is property of www.arstextura.de.
Finishing and Edging
As you near the completion of your crocheted dishcloth, it’s important to give it a polished and finished look. The finishing touches not only enhance the appearance of your work but also ensure durability and longevity.
Fastening Off
Fastening off is the process of securely closing your final stitch and securing the yarn tail. By properly fastening off, you prevent your dishcloth from unraveling and ensure that your hard work will last.
To fasten off:
- Cut the yarn, leaving a tail of a few inches.
- Yarn over and pull the yarn through the loop on your hook, securing the stitch.
- Pull the yarn tail through the loop, tightening it.
It’s essential to weave in the yarn tail into the fabric using a yarn needle to ensure it is secure and not visible.
Weaving in Ends
Weaving in ends is the final step in securing any loose yarn tails or ends from color changes. By weaving in the ends, you ensure that your dishcloth looks clean and professional, without any loose yarn that could unravel over time.
To weave in ends:
- Thread the yarn tail onto a yarn needle.
- Insert the needle under the loops of nearby stitches, following the natural path of the stitches.
- After weaving for a few inches, cut the yarn tail close to the fabric, leaving a small tail that will tuck into the stitches.
Take care to weave in the ends neatly and invisibly, ensuring that they will not come loose with use.
Adding a Border
Adding a border is an optional but wonderful way to frame and complete your crocheted dishcloth. A border can enhance the overall aesthetic, provide additional stability to the edges, and add a touch of elegance.
To add a border:
- Start in any corner of your dishcloth.
- Choose a stitch or combination of stitches to create the border (e.g., single crochet, double crochet, picot stitches).
- Crochet the desired number of stitches or follow the specific pattern for the selected border stitch.
- Once you reach a corner, work multiple stitches in the same corner stitch to turn the corner and maintain the shape of your dishcloth.
- Continue working the desired border stitch or stitches along the edges, turning the corners as needed.
- Once you have completed the final edge, join the border stitches with a slip stitch and fasten off.
Experiment with different border stitches and combinations to find the perfect finishing touch for your crocheted dishcloth.
Caring for Your Crocheted Dishcloth
To ensure your crocheted dishcloth stays in great condition and maintains its functionality, proper care is essential. Here are some recommendations for washing, drying, storing, and maintaining your dishcloth.
Washing and Drying Recommendations
Since dishcloths are used for cleaning, they can quickly accumulate dirt and bacteria. It’s important to wash them regularly to prevent any buildup or odors. Follow these guidelines for washing and drying your crocheted dishcloth:
- Check the yarn label for any specific washing instructions or recommendations.
- Fill a sink or basin with warm water and mild detergent.
- Gently agitate the water to create suds.
- Place the dishcloth in the soapy water and lightly scrub any soiled areas.
- Rinse the dishcloth well under clean water to remove any soap residue.
- Squeeze out excess water gently, taking care not to wring or twist the fabric.
- Lay the dishcloth flat on a clean, dry towel and roll it up to absorb excess moisture.
- Unroll the towel and reshape the dishcloth if necessary.
- Lay the dishcloth flat on a drying rack or clean, dry surface, allowing it to air dry completely.
Avoid using harsh detergents or bleaching agents, as they can damage or discolor the yarn fibers. If desired, you can also machine wash your dishcloth on a gentle cycle using a laundry bag or pillowcase to protect it from snagging or stretching. Always air dry rather than using a dryer to prevent shrinkage or distortion.
Storing and Maintaining
When your crocheted dishcloths are not in use, proper storage is crucial to maintain their quality and longevity. Here are some tips for storing and maintaining your dishcloths:
- Make sure your dishcloth is completely dry before storing to prevent mold or mildew growth.
- Fold or roll the dishcloth neatly to minimize wrinkles and creases.
- Store your dishcloths in a clean, dry, and well-ventilated area to prevent moisture and odors.
- Avoid storing dishcloths in direct sunlight, as it can fade the colors over time.
- Periodically inspect your dishcloths for any signs of wear, loose threads, or damage. Repair any issues promptly to prevent further damage.
By following these simple care and maintenance practices, you can extend the lifespan of your crocheted dishcloths and enjoy them for years to come.

This image is property of d2tk9av7ph0ga6.cloudfront.net.
Variations and Embellishments
If you’re feeling adventurous and want to add a personal touch to your crocheted dishcloths, there are endless variations and embellishments you can explore. Here are a few ideas to spark your creativity:
Embroidery and Appliqué
Add a pop of color and texture to your dishcloth by incorporating embroidery or appliqué. You can use embroidery floss or thin yarn to create intricate designs or attach small crochet motifs such as flowers, hearts, or animals. Embroidery and appliqué allow you to personalize your dishcloth and make it truly one-of-a-kind.
Using Different Yarn Types
While cotton yarn is the traditional choice for dishcloths, don’t be afraid to experiment with different yarn types. You can try using bamboo or linen yarn for a lightweight and silky texture, or acrylic yarn for vibrant and durable dishcloths. Just keep in mind the intended use and desired texture when selecting alternative yarn options.
Experimenting with Stitch Patterns
Take your crocheted dishcloths to the next level by incorporating unique stitch patterns. From lacework to cables, the possibilities are truly endless. Explore stitch pattern books or online resources for inspiration and try out different stitches to create intricate and eye-catching designs.
By adding variations and embellishments to your crocheted dishcloths, you can create truly unique and personalized pieces that reflect your style and creativity.
Ideas for Using Your Crocheted Dishcloth
Now that you have mastered the art of crocheting dishcloths, you may be wondering how to put them to good use. Here are some ideas for incorporating your crocheted dishcloths into your daily life:
Kitchen Accessories
Aside from their primary purpose of cleaning, dishcloths can also be used as kitchen accessories. Use them as hot pads or trivets to protect your countertops and tables from heat. Fold them neatly and display them on hooks or in a decorative bowl to add a touch of color and charm to your kitchen decor.
Gift Ideas
Crocheted dishcloths make excellent handmade gifts for friends and loved ones. Personalize them with their favorite colors or incorporate their hobbies or interests into the design. Bundle a few dishcloths together with a jar of homemade jam or a scented candle for a thoughtful and functional gift.
Home Decor
Get creative with how you display your crocheted dishcloths. Attach them to wooden dowels or embroidery hoops to create unique wall hangings. Use them as decorative accents on side tables or shelves, folded and stacked neatly with other linens. The possibilities are endless when it comes to incorporating crocheted dishcloths into your home decor.
Enjoy the process of crocheting dishcloths and let your creativity shine as you explore different techniques, stitch patterns, and design ideas. With each project, you’ll not only create functional items but also develop your crochet skills and leave a personal touch on everything you make. Happy crocheting!

This image is property of www.gemachtmitliebe.de.